Sunday, November 26, 2017

Part 12 - JQuery Traversing - #Sibling Elements Traversal | siblings, next, prev, nextAll, prevAll


Jquery Traversing?
In this tutorial will discuss about  jquery traversal specially, Sibling Element Traversal.  Traversing means to reach to the particular element present in DOM Tree

Parent  Element Traversal
  1. parent(): It returns the direct parent element of the selected element.
  2. parents(): It returns all ancestor elements of the selected element.
  3. parentsUntil(): It returns all ancestor elements between two given arguments.

Child Element Traversal
  1. children(): It returns all direct children of the selected element.
  2. find(): It returns descendant elements of the selected element.

Sibling  Element Traversal 
  1. siblings() : It returns all sibling elements of the selected element 
  2. next() : It returns the next sibling element of the selected element.
  3. nextAll(): It returns all next sibling elements of the selected element
  4. nextUntil(): It returns all next sibling elements between two given arguments
  5. prev: It returns the previous sibling element of the selected element
  6. prevAll(): It returns all previous sibling elements of the selected element
  7. prevUntil(): It returns all previous sibling elements between two given arguments


# Example
Replace your html code with below code 

<!DOCTYPE html>
<html xmlns="http://www.w3.org/1999/xhtml">
<head>
    <title></title>
    <script src="jquery-3.2.1.min.js"></script>
    <style>
        .ancestor * {
            display: block;
            padding: 10px;
            margin: 10px;
            border: 2px solid gray;
        }
    </style>

    <script>


        $(document).ready(function () {
                    
            //$("h2").siblings().css({ "border": "2px solid red" })
            //$("h2").next().css({ "border": "2px solid red" })
           // $("h2").nextAll().css({ "border": "2px solid red" })

            //$("h2").nextUntil("h4").css({ "border": "2px solid red" })
            //$("h2").prev().css({ "border": "2px solid red" })
            //$("h2").prevAll().css({ "border": "2px solid red" })
            $("h2").prevUntil("span").css({ "border": "2px solid red" })

 
        })
    </script>


</head>
<body>

    <div class="ancestor">
       <p>Paragraph1</p>
        <span>span1</span>
        <h1>h1</h1>
        <h2 style="background-color:gray">h2</h2>
        <h3>h3</h3>
        <h4>h4</h4>
        <p>paragraph2</p>
        <span>span2</span>
    </div>


</body>
</html>

Part 11 - JQuery Traversing - #Child Element Traversal | children and find methods


Jquery Traversing?
In this tutorial will discuss about  jquery traversal specially, Child Element Traversal.  Traversing means to reach to the particular element present in DOM Tree

Parent  Element Traversal
  1. parent(): It returns the direct parent element of the selected element.
  2. parents(): It returns all ancestor elements of the selected element.
  3. parentsUntil(): It returns all ancestor elements between two given arguments.

Child Element Traversal
  1. children(): It returns all direct children of the selected element.
  2. find(): It returns descendant elements of the selected element.

Sibling  Element Traversal 
  1. siblings() : It returns all sibling elements of the selected element 
  2. next() : It returns the next sibling element of the selected element.
  3. nextAll(): It returns all next sibling elements of the selected element
  4. nextUntil(): It returns all next sibling elements between two given arguments
  5. prev: It returns the previous sibling element of the selected element
  6. prevAll(): It returns all previous sibling elements of the selected element
  7. prevUntil(): It returns all previous sibling elements between two given arguments


# Example
Replace your html code with below code 

<!DOCTYPE html>
<html xmlns="http://www.w3.org/1999/xhtml">
<head>
    <title></title>
    <script src="jquery-3.2.1.min.js"></script>
    <style>
        .ancestor * {
            display: block;
            padding: 10px;
            margin: 10px;
            border: 2px solid gray;
        }
    </style>

    <script>


        $(document).ready(function () {
                    
           
            //children 
            //$(".ancestor").children("div").css({ "border": "2px solid red" })

            //find
            $(".ancestor").find(".para1").css({ "border": "2px solid red" })

 
        })
    </script>


</head>
<body>

    <div class="ancestor">
        Ancestor

        <div class="div1">
            direct child of ancester
            <ul>
                Grand child #ul
                <li>
                    great grand child #li
                    <span>Child</span>
                </li>
            </ul>

        </div>


    </div>

    <div class="ancestor">
        <p>Paragraph1</p>
        <p>Paragraph1</p>
        <p class="para1">Paragraph1</p>
        <span>Span1</span>
    </div>
   
</body>
</html>

Part 10 - JQuery Traversing - #Parent Element Traversal | parent, parents and parentsUntil methods


Jquery Traversing?
In this tutorial will discuss about  jquery traversal specially, Parent Element Traversal.  Traversing means to reach to the particular element present in DOM Tree

Parent  Element Traversal
  1. parent(): It returns the direct parent element of the selected element.
  2. parents(): It returns all ancestor elements of the selected element.
  3. parentsUntil(): It returns all ancestor elements between two given arguments.

Child Element Traversal
  1. children(): It returns all direct children of the selected element.
  2. find(): It returns descendant elements of the selected element.

Sibling  Element Traversal 
  1. siblings() : It returns all sibling elements of the selected element 
  2. next() : It returns the next sibling element of the selected element.
  3. nextAll(): It returns all next sibling elements of the selected element
  4. nextUntil(): It returns all next sibling elements between two given arguments
  5. prev: It returns the previous sibling element of the selected element
  6. prevAll(): It returns all previous sibling elements of the selected element
  7. prevUntil(): It returns all previous sibling elements between two given arguments

# Example
Replace your html code with below code 

<!DOCTYPE html>
<html xmlns="http://www.w3.org/1999/xhtml">
<head>
    <title></title>
    <script src="jquery-3.2.1.min.js"></script>
    <style>
        .ancestor * {
            display: block;
            padding: 10px;
            margin: 10px;
            border: 2px solid gray;
        }
    </style>

    <script>


        $(document).ready(function () {
            //*********Parent***********            
           // $("span").parent().css({ "border": "2px solid red" })
            //$("span").parent("li").css({ "border": "2px solid red" })

            //*********Parents***********  
            //$("span").parents().css({ "border": "2px solid red" })
            //$("span").parents(".div1").css({ "border": "2px solid red" })

            //*********ParentsUntil***********          
            $("span").parentsUntil(".ancestor").css({ "border": "2px solid red" })

        })
    </script>


</head>
<body>

    <div class="ancestor">
        Ancestor

        <div class="div1">
            Great grand Parent #div
            <ul>
                Grand Parent #ul
                <li>
                    Direct parent #li
                    <span>Child</span>
                </li>
            </ul>

        </div>


    </div>

   
</body>
</html>


Part 9 - Event Handler Attachment - on, off and one methods


Event Handler Attachment - on (), off () and one () methods
  1. .on( events [, selector ] [, data ], handler ): Attach an event handler function for one or more events to the selected elements.
  2. .off( events [, selector ] [, handler ] ): Remove event handler
  3. .one( events [, selector ] [, data ], handler ); Attach a handler to an event for the elements. The handler is executed at most once per element per event type.
Parameters
  1. events: One or more space-separated event types( mouseenter, mouseleave, click etc.)
  2. selector: A selector string for filtering the descendants of the selected elements that trigger the event. 
  3. data: Data to be passed to the handler in event.data when an event is triggered..
  4.  handler:  Function( Event eventObject [, Anything extraParameter ] [, ... ] ).  A function to execute when the event is triggered. 


# Example
Replace your html code with below code 

<!DOCTYPE html>
<html xmlns="http://www.w3.org/1999/xhtml">
<head>
    <title></title>
    <script src="jquery-3.2.1.min.js"></script>

    <script>

        $(document).ready(function () {

            //case1
            $("#button1").on("click", function () {

                alert("single event and single handler");
            })

            //case2 : multiple event type and single handler function
            $("#button2").on("click mouseleave mouseenter", function () {

                $("span").text("multiple event type and single handler function").fadeIn("slow").fadeOut("slow");
            })
            //case3 : pass data to the handler function
            $("#button3").on("click", { fname: "Ashish", lname: "Tiwary" }, function (event) {

                $("span").text(event.data.fname + " " + event.data.lname).fadeIn("slow").fadeOut("slow");
            })

            //case4 : multiple event handler
            $("#button4").on({
                click: function () {

                    $("span").text("A click event");

                },
                mouseenter: function () {
                    $("span").text("Mouse Enter event was triggered");

                }

            })

            //case5: passed all parameters
            $("div").on("click", "span", { fname: "Ashish", lname: "Tiwary" }, function (event) {

                $("#childSpan").text(" Child Span has recieved data = " + event.data.fname + " " + event.data.lname);
            })

            //case6: condition based handler

            $("#button5").on("click mouseleave", function (event) {

                if (event.type == "click") {

                    $("#childSpan").text("It was click event");

                }
                else {
                    $("#childSpan").text("It was a mouse Leave event");

                }

            })
            
            // OFF method
            $("#button6").on("click mouseleave", function (event) {                
                  alert("button was clicked or was mouse entered")
            })

            $("#button6").off("click");

            //one Method

            $("#button7").one("click dblclick", function (event) {
                alert("click or dbl click")
            })


        })


    </script>
    <style>
        .btnclass {
            height: 200px;
            width: 200px;
        }
    </style>

</head>
<body>

    <div style="border:2px solid blue;color:green">
        <p>
            <button id="button1" class="btnclass">simple handler </button>
            <button id="button2" class="btnclass">multiple event type</button>
            <button id="button3" class="btnclass">Passing data to handler</button>
            <button id="button4" class="btnclass">Multiple event handler</button>
            <button id="button5" class="btnclass">handler based on condition</button>
            
            <button id="button6" class="btnclass">OFF method</button>

            <button id="button7" class="btnclass">One method</button>

            <span class="btnclass" style="border:2px solid blue;color:red" id="childSpan">child span click </span>
        </p>

    </div>
    <span style="color:red;"></span>

</body>
</html>


Part 8 - JQuery Events - #Document and Windows Events| load, resize, and scroll methods


JQuery Events?
ln this tutorial will discuss about Events in jquery specially, Document/windows Events. We have several type of event types available which consists a lot of methods to perform some action when some event occur.

Event types

1. Mouse Events 
  1. click (): Occurs when a mouse click.
  2. dblclick () :Occurs when a mouse double-click.
  3. mousedown (): Occurs when mouse button is pressed.
  4. mouseup (): Occurs when mouse button is released
  5. mouseenter (): Occurs when mouse enters in an element region.
  6. mouseleave (): Occurs when mouse leaves an element region.
  7. mousemove (): Occurs when mouse pointer moves.
2. Keyboard Events 
  1. Keydown (): Occurs when key is pressed.
  2. Keypress (): Occurs when key is pressed and released.
  3. Keyup (): Occurs when key is released..
3. Form Events 
  1. blur (): Occurs when the element loses focus.
  2. change (): Occurs when the element changes.
  3. focus (): Occurs when the element gets focus.
  4. Submit (): Occurs when form is submitted
  5. Select ():Occurs when input text is selected

4. Document/windows Events 
  1. load (): Occurs when document is loaded.
  2. Resize (): Occurs when window is resized.
  3. Scroll (): Occurs when window is scrolled.
  4. Unload (): Occurs when documents is unloaded. are actions that can be detected by your Web Application.


# Example
Replace your html code with below code 

<!DOCTYPE html>
<html xmlns="http://www.w3.org/1999/xhtml">
<head>
    <title></title>
    <script src="jquery-3.2.1.min.js"></script>

    <script>

        $(document).ready(function () {


            $("#image1").on("load", function (event) {
                var message = "height: " + $(this).height() + " width: " + $(this).width()
                $("span").text(message);
            })

            $("div").scroll(function () {

                var message = "scrolled<br/>";
                $("span").append(message);
            })

        })

        $(window).resize(function () {

            var message = "height: " + $(this).height() + " width: " + $(this).width()
            $("span").text(message);
        })


    </script>
    <style>
        .btnclass {
            height: 200px;
            width: 200px;
            overflow:scroll;
        }
    </style>

</head>
<body>
    <span></span>

    <div class="btnclass" >
        <img src="banner.png?dummy=sdfhskdfhihhssssdssssss" id="image1" />

    </div>
   
   
</body>
</html>

Part 7 - JQuery Events - #Form Events | blur, focus, change, submit, select methods


JQuery Events?
ln this tutorial will discuss about Events in jquery specially, Form Events. We have several type of event types available which consists a lot of methods to perform some action when some event occur.

Event types

1. Mouse Events 
  1. click (): Occurs when a mouse click.
  2. dblclick () :Occurs when a mouse double-click.
  3. mousedown (): Occurs when mouse button is pressed.
  4. mouseup (): Occurs when mouse button is released
  5. mouseenter (): Occurs when mouse enters in an element region.
  6. mouseleave (): Occurs when mouse leaves an element region.
  7. mousemove (): Occurs when mouse pointer moves.
2. Keyboard Events 
  1. Keydown (): Occurs when key is pressed.
  2. Keypress (): Occurs when key is pressed and released.
  3. Keyup (): Occurs when key is released..
3. Form Events 
  1. blur (): Occurs when the element loses focus.
  2. change (): Occurs when the element changes.
  3. focus (): Occurs when the element gets focus.
  4. Submit (): Occurs when form is submitted
  5. Select ():Occurs when input text is selected

4. Document/windows Events 
  1. load (): Occurs when document is loaded.
  2. Resize (): Occurs when window is resized.
  3. Scroll (): Occurs when window is scrolled.
  4. Unload (): Occurs when documents is unloaded. are actions that can be detected by your Web Application.


# Example
Replace your html code with below code 

<!DOCTYPE html>
<html xmlns="http://www.w3.org/1999/xhtml">
<head>
    <title></title>
    <script src="jquery-3.2.1.min.js"></script>

    <script>

        $(document).ready(function () {


            $("#text1").blur(function (event) {

                $(this).css({"background-color":"red","color":"white"})

            })

            $("#text2").change(function (event) {

                $(this).css({ "background-color": "blue", "color": "white" })

            })

            $("#text3").focus(function (event) {

                $(this).css({ "background-color": "green", "color": "white" })

            })

            $("#myform").submit(function () {

                var first = $("#first").val();
                var second = $("#second").val();
                $("span").text(first + " " + second);


            })

            $("#select1").select(function () {

                alert("something selected")

            })
        })


    </script>
    <style>
        .btnclass {
            height: 100px;
            width: 100px;
        }
    </style>

</head>
<body>

    <input type="text" id="text1" placeholder="blur event" />

    <input type="text" id="text2" placeholder="change event" />
    <input type="text" id="text3" placeholder="focus event" />
    <br /><br />
    <form id="myform">
        
        <input type="text" id="first" placeholder="first name" />
        <input type="text" id="second" placeholder="last name" />
        <input type="submit" />

    </form>
    <span>

    </span>

    <br />

    <input type="text" id="select1" placeholder="select event" />


</body>
</html>


Part 6 - JQuery Events - #Mouse & Keyboard Events| click, dblclick, mousedown, mouseup methods


JQuery Events?
ln this tutorial will discuss about Events in jquery specially Mouse and Keyboard events. We have several type of event types available which consists a lot of methods to perform some action whensome event occur.

Event types

1. Mouse Events 
  1. click (): Occurs when a mouse click.
  2. dblclick () :Occurs when a mouse double-click.
  3. mousedown (): Occurs when mouse button is pressed.
  4. mouseup (): Occurs when mouse button is released
  5. mouseenter (): Occurs when mouse enters in an element region.
  6. mouseleave (): Occurs when mouse leaves an element region.
  7. mousemove (): Occurs when mouse pointer moves.

2. Keyboard Events 
  1. Keydown (): Occurs when key is pressed.
  2. Keypress (): Occurs when key is pressed and released.
  3. Keyup (): Occurs when key is released..
3. Form Events 
  1. blur (): Occurs when the element loses focus.
  2. change (): Occurs when the element changes.
  3. focus (): Occurs when the element gets focus.
  4. Submit (): Occurs when form is submitted
  5. Select ():Occurs when input text is selected


4. Document/windows Events 
  1. load (): Occurs when document is loaded.
  2. Resize (): Occurs when window is resized.
  3. Scroll (): Occurs when window is scrolled.
  4. Unload (): Occurs when documents is unloaded. are actions that can be detected by your Web Application.


# Example
Replace your html code with below code 

<!DOCTYPE html>
<html xmlns="http://www.w3.org/1999/xhtml">
<head>
    <title></title>
    <script src="jquery-3.2.1.min.js"></script>

    <script>

        $(document).ready(function () {

            // $("span ").css({ "border": "2px solid red", "padding": "10px" });

            // $("table th").css({ "background-color": "red", "color": "white" });

            // $("table tr:even").css({ "background-color": "blue", "color": "white" });

            //$("table tr:odd").css({ "background-color": "yellow", "color": "black" });

            // $("p:first").css({ "border": "2px solid blue", "padding": "10px" });
            // $("p:last").css({ "border": "2px solid blue", "padding": "10px" });

            $("div[title]").css({ "border": "2px solid blue", "padding": "10px" });

            $("a[href='google.com']").css({ "border": "2px solid red", "padding": "10px" });


            $("#button1").click(function () {
                alert("I am clicked")

            })

            $("#button2").dblclick(function () {
                alert("I am double clicked")

            })

            $("#button3").mousedown(function () {
                alert("Mouse down")

            })

            $("#button4").mouseup(function () {
                alert("Mouse up")

            })
            $("#button5").mouseenter(function () {
                alert("Mouse enter")

            })
            $("#button6").mouseleave(function () {
                alert("Mouse leave")

            })

            $("#div1").mousemove(function (event) {

                $(this).html("PageX:" + event.pageX + " PageY:" + event.pageY);

            })

            $("#button7").keyup(function (event) {

                alert("key  up : " + event.key +" "+ event.keyCode)

            })

            $("#button8").keydown(function (event) {

                alert("key down: " + event.key + " " + event.keyCode)

            })
            $("#button9").keypress(function (event) {

                alert("key press: " + event.key + " " + event.keyCode)

            })
        })

    </script>

</head>
<body>
    
    <div title="div1" style="margin-bottom:50px;padding:10px">
        <a href="google.com">click</a>
        <span>child1  </span>
    </div>

    <button id="button1" style="width:100px;height:100px">Click Me </button>
    <button id="button2" style="width:100px;height:100px">dblClick Me </button>

    <button id="button3" style="width:100px;height:100px">Mousedown  </button>


    <button id="button4" style="width:100px;height:100px">Mouseup</button>


    <button id="button5" style="width:100px;height:100px">Mouse Enter </button>


    <button id="button6" style="width:100px;height:100px">Mouse Leave </button>

    <input type="text" id="button7" placeholder="key up">
    <input type="text" id="button8" placeholder="key down">
    <input type="text" id="button9" placeholder="key press">


    <div id="div1" style="height:100px;width:100px;border:2px solid blue">

    </div>
    <div id="div2" style="height:100px;width:100px;border:2px solid red">

    </div>

    <div title="div2" style="margin-bottom: 50px;padding:10px">
        <a title="mylink" href="technotipstutorial.blogspot.com">click</a>
        <span>child2  </span>
    </div>

    <div title="div3" style="margin-bottom: 50px;padding:10px">
        <table border="1" style="width:30%">
            <tr>
                <th>
                    Name
                </th>
                <th>Department</th>
            </tr>
            <tbody>
                <tr><td>Ashish</td><td>Development</td></tr>
                <tr><td>John</td><td>QA</td></tr>
                <tr><td>Sara</td><td>Development</td></tr>
                <tr><td>Lara</td><td>Implementation</td></tr>
                <tr><td>Methew</td><td>Development</td></tr>
                <tr><td>Ashish</td><td>Development</td></tr>

            </tbody>

        </table>
    </div>

    <span title="span1" style="margin-bottom: 50px;padding:10px">
        span1
    </span>

    <span title="span2" style="margin-bottom: 50px;padding:10px">
        span2
    </span>

</body>
</html>

Part 5 - Attribute Selectors in JQuery?


Selectors in JQuery?
A jQuery selectors selects or finds a DOM element in an HTML document. It is used to select HTML elements based on id, name, types, attributes, class etc. 

popular selectors
  1. Id selectors
  2. Class selectors
  3. Element selectors
  4. Attribute selectors
For selecting input elements like Select, TextArea, Button, Image, Radio etc. we can use $(“:input”) selector. It will return a collection of input elements.
 Example: $(":input[type='button']") , $(":input[type='radio']")

Attribute Selectors in JQuery:
In this tutorial only Attribute selectors are explained. Attribute selectors are used to select element by attribute names. For example href, title, style,  etc.

# Example
Replace your html code with below code 

<!DOCTYPE html>
<html xmlns="http://www.w3.org/1999/xhtml">
<head>
    <title></title>
    <script src="jquery-3.2.1.min.js"></script>

    <script>

        $(document).ready(function () {

           // $("span ").css({ "border": "2px solid red", "padding": "10px" });

           // $("table th").css({ "background-color": "red", "color": "white" });

           // $("table tr:even").css({ "background-color": "blue", "color": "white" });

           //$("table tr:odd").css({ "background-color": "yellow", "color": "black" });

           // $("p:first").css({ "border": "2px solid blue", "padding": "10px" });
           // $("p:last").css({ "border": "2px solid blue", "padding": "10px" });

            $("div[title]").css({ "border": "2px solid blue", "padding": "10px" });

            $("a[href='google.com']").css({ "border": "2px solid red", "padding": "10px" });

        })


    </script>

</head>
<body>

    <div title="div1" style="margin-bottom:50px;padding:10px">
        <a href="google.com">click</a>
        <span>child1  </span>
    </div>

    <div title="div2" style="margin-bottom: 50px;padding:10px">
        <a title="mylink" href="technotipstutorial.blogspot.com">click</a>
        <span>child2  </span>
    </div>


    <div title="div3" style="margin-bottom: 50px;padding:10px">
        <table border="1" style="width:30%">
            <tr>
                <th>
                    Name
                </th>
                <th>Department</th>
            </tr>
            <tbody>
                <tr><td>Ashish</td><td>Development</td></tr>
                <tr><td>John</td><td>QA</td></tr>
                <tr><td>Sara</td><td>Development</td></tr>
                <tr><td>Lara</td><td>Implementation</td></tr>
                <tr><td>Methew</td><td>Development</td></tr>
                <tr><td>Ashish</td><td>Development</td></tr>

            </tbody>

        </table>
    </div>
    <span title="span1" style="margin-bottom: 50px;padding:10px">
       span1
    </span>

    <span title="span2" style="margin-bottom: 50px;padding:10px">
        span2
    </span>


</body>
</html>


Part 4 - Element selectors in JQuery?


What are selectors in jQuery? 

A jQuery selectors selects or finds a DOM element in an HTML document. It is used to select HTML elements based on id, name, types, attributes, class etc. 
popular selectors
  1. Id selectors
  2. Class selectors
  3. Element selectors
  4. Attribute selectors
For selecting input elements like Select, TextArea, Button, Image, Radio etc. we can use $(“:input”) selector. It will return a collection of input elements.
 Example: $(":input[type='button']") , $(":input[type='radio']")

ID and Class selectors
In this tutorial only Element selectors are explained. Element selectors are used to select element by element name. For example: div, p, span, h1, h2 etc.

# Example
Replace your html code with below code and try to show alert on button click in Jquery

<!DOCTYPE html>
<html xmlns="http://www.w3.org/1999/xhtml">
<head>
    <title></title>
    <script src="jquery-3.2.1.min.js"></script>

    <script>

        $(document).ready(function () {

            $("span ").css({ "border": "2px solid red", "padding": "10px" });

            $("table th").css({ "background-color": "red", "color": "white" });

            $("table tr:even").css({ "background-color": "blue", "color": "white" });

           $("table tr:odd").css({ "background-color": "yellow", "color": "black" });

            $("p:first").css({ "border": "2px solid blue", "padding": "10px" });
            $("p:last").css({ "border": "2px solid blue", "padding": "10px" });

           
        })


    </script>

</head>
<body>

    <div class="div1" style="margin-bottom:50px;padding:10px">
        <button>click</button>
        <span>child1  </span>
    </div>

    <div class="div2" style="margin-bottom: 50px;padding:10px">
        <button>click</button>
        <span>child2  </span>
    </div>


    <div>
        <table border="1" style="width:30%">
            <tr>
                <th>
                    Name
                </th>
                <th>Department</th>
            </tr>
            <tbody>
                <tr><td>Ashish</td><td>Development</td></tr>
                <tr><td>John</td><td>QA</td></tr>
                <tr><td>Sara</td><td>Development</td></tr>
                <tr><td>Lara</td><td>Implementation</td></tr>
                <tr><td>Methew</td><td>Development</td></tr>
                <tr><td>Ashish</td><td>Development</td></tr>

            </tbody>

        </table>
    </div>
    
    <h1>header1</h1>
    <h2>header2</h2>
    <h3>header3</h3>

    <p>paragraph 1</p>
    <p>paragraph 2</p>
    <p>paragraph 3</p>

</body>
</html>

Part 3 - What are jQuery Selectors? | ID and class selectors


What are selectors in jQuery? 

A jQuery selectors selects or finds a DOM element in an HTML document. It is used to select HTML elements based on id, name, types, attributes, class etc. 
popular selectors
  1. Id selectors
  2. Class selectors
  3. Element selectors
  4. Attribute selectors
For selecting input elements like Select, TextArea, Button, Image, Radio etc. we can use $(“:input”) selector. It will return a collection of input elements.
 Example: $(":input[type='button']") , $(":input[type='radio']")

ID and Class selectors
In this tutorial only ID and class selectors are explained. If we select element by its id the we need to use $('#element_id') and if we access element by class name then we need to  use $('.ClassName')

# Example
Replace your html code with below code and try to show alert on button click in Jquery

<!DOCTYPE html>
<html xmlns="http://www.w3.org/1999/xhtml">
<head>
    <title></title>
    <script src="jquery-3.2.1.min.js"></script>

    <script>

        $(document).ready(function () {

           //Class selector example
            $(".div1,.div2").css({ "border": "2px solid red", "padding": "10px" });

            //Id selector example
            // $("#myDiv").css({ "border": "2px solid blue", "padding": "10px" });

        })

    </script>

</head>
<body>

    <div id="myDiv" class="div1" style="margin-bottom:50px;padding:10px">
        <button>click</button>
        <span>child1  </span>
    </div>

    <div class="div2" style="padding:10px">
        <button>click</button>
        <span>child2  </span>
    </div>

</body>
</html>


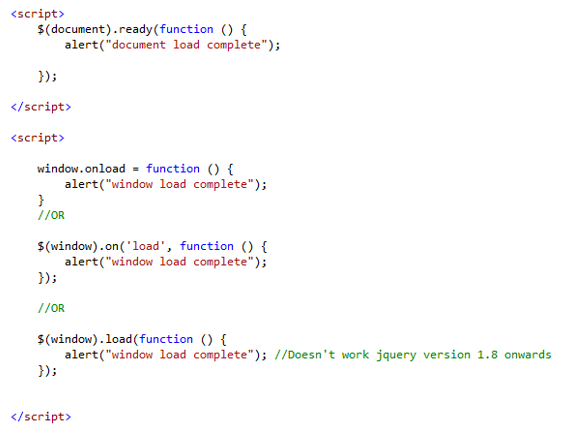
Part 2 - Difference between Document ready and Window onload Events


$(Document).Ready() vs window.onload()

$(document).ready() is a jQuery event. This method gets called as soon as the DOM gets ready.
DOM means all the html tags i.e. anchor tag, table, div, paragraph etc..). 

Main points for $(document).ready():
  1. It will not wait for the images, frames etc. to be loaded.
  2. It is used to execute JavaScript when the DOM is completely loaded. 
  3. It is not used if you want to manipulate images. Use window.onload() instead.

The window load event gets fired, when the complete page is fully loaded, including all frames, objects and images. Therefore functions which concern images or other page contents should be placed in the load event.

# Example


Part 1 - What is JQuery | Create your first JQuery project | Step by Step tutorial


What is JQuery ?

jQuery is a cross-platform JavaScript library designed to simplify the client-side scripting of HTML. It is fast, small, and feature-rich JavaScript library
The jQuery library contains the following features:

  1. HTML/DOM manipulation
  2. CSS manipulation
  3. Event handling
  4. Effects and animations
  5. AJAX
  6. JSON parsing
  7. Extensibility through plug-ins

JavaScript code requires many lines of code to accomplish some task but, jQuery can do the same thing in single line of code

Steps to create first project

  1. Download latest jQuery file from official site here: Download latest version of jquery
  2. Open Your IDE and create an html page
  3. Include jQuery file in your project and give the reference of it in html page. 
  4. Try below example

# Example
Replace your html code with below code and try to show alert on button click in Jquery

<!DOCTYPE html>
<html xmlns="http://www.w3.org/1999/xhtml">
<head>
    <title></title>
    <script src="jquery-3.2.1.min.js"></script>

    <script>

        $(document).ready(function () {
            $("button").click(function () {
                alert("Button was clicked")
            })

        })
    </script>
</head>
<body>
    <button>Click to show alert</button>
</body>
</html>

Part 50 - Refresh DataTable After Performing Any Action in ASP.NET MVC


In this video you will be able to know how refresh datatable after performing any action like add edit delete etc. in server side processing 

If you are new to DataTables then please download latest version of Jquery DataTable. Click here to download the latest version of Jquery Datatable and watch my previous tutorial to get step by step DataTable plugin installation guide. you can visit here: Integrate JQuery DataTable plugin into Asp.net MVC 


# View Page (Index.cshtml)
Right click on your controller' s Index method and add a view. After adding view, replace content with below code. 

@model MVCTutorial.Models.EmployeeViewModel
@{
    ViewBag.Title = "Index";
    // Layout = null;
}

<div class="panel panel-body" style="min-height:256px">

    <div class="col-md-3">

        @{ Html.RenderAction("SideMenu", "Test");}

    </div>

    <div class="col-md-9">

        <div class="well">
            <a href="#" class="btn btn-primary" onclick="AddEditEmployee(0)">New</a>
        </div>

        <div class="well">
            <div class="col-md-3">
                <input type="text" id="EName" class="form-control" />
               
            </div>
            <div class="col-md-3">
                <a href="#" class="btn  btn-primary" onclick="FilterRecord()">Filter</a>
                
            </div>
            <div class="clearfix"></div>
        </div>
        <table class="display" id="MyDataTable">
            <thead>
                <tr>
                    <th>
                        EmaployeeName
                    </th>
                    <th>
                        Department
                    </th>
                    <th>
                        Address
                    </th>
                    <th>
                        EmployeeId
                    </th>
                </tr>
            </thead>

            <tbody></tbody>

        </table>
        <div class="modal fade" id="myModal1">
            <div class="modal-dialog">
                <div class="modal-content">
                    <div class="modal-header">
                        <a href="#" class="close" data-dismiss="modal">&times;</a>
                        <h3 class="modal-title">AddEdit Employee</h3>
                    </div>
                    <div class="modal-body" id="myModalBodyDiv1">


                    </div>


                </div>

            </div>

        </div>

        <input type="hidden" id="hiddenEmployeeId" />
    </div>
</div>

<script>

    $(document).ready(function () {

        // $("#MyDataTable").DataTable();

        BindDataTable();
    })

    var oTable;
    var FilterRecord = function () {

        BindDataTable();
    }

    var BindDataTable = function (response) {

        if ($.fn.DataTable.isDataTable("#MyDataTable")) {
            debugger
            oTable.draw();
            //oTable.fnDraw();

        }
        else {
            debugger
            oTable=  $("#MyDataTable").DataTable({
                "bServerSide": true,
                "sAjaxSource": "/Test/GetEmployeeRecord",
                "fnServerData": function (sSource, aoData, fnCallback) {

                    var EName = $("#EName").val();

                    aoData.push({ "name": "EName", "value": EName });

                    $.ajax({

                        type: "Get",
                        data: aoData,
                        url: sSource,
                        success: fnCallback
                    })

                },
                "aoColumns": [

                    { "mData": "Name" },
                    { "mData": "DepartmentName" },
                    { "mData": "Address" },
                    {
                        "mData": "EmployeeId",
                        "render": function (EmployeeId, type, full, meta) {

                            return '<a href="#" onclick="AddEditEmployee(' + EmployeeId + ')"><i class="glyphicon glyphicon-pencil"></i></a>'
                        }
                    },


                ]

            });
        }
    }
    var AddEditEmployee = function (employeeId) {

        var url = "/Test/AddEditEmployee?EmployeeId=" + employeeId;

        $("#myModalBodyDiv1").load(url, function () {
            $("#myModal1").modal("show");

        })

    }
</script>


  # DataTablesParam Class.
Create a class named DataTableParams and copy below code into this. This class will be used for receiving dataTables default parameters. You can remove extra properties which are not useful to you. Also, please don't forget to copy EmployeeViewModel  from Part 20 of this tutorial series. 

public class DataTablesParam
    {
        public int iDisplayStart { get; set; }
        public int iDisplayLength { get; set; }
        public int iColumns { get; set; }
        public string sSearch { get; set; }
        public bool bEscapeRegex { get; set; }
        public int iSortingCols { get; set; }
        public int sEcho { get; set; }
        public List<string> sColumnNames { get; set; }
        public List<bool> bSortable { get; set; }
        public List<bool> bSearchable { get; set; }
        public List<string> sSearchValues { get; set; }
        public List<int> iSortCol { get; set; }
        public List<string> sSortDir { get; set; }
        public List<bool> bEscapeRegexColumns { get; set; }

        public DataTablesParam()
        {
            sColumnNames = new List<string>();
            bSortable = new List<bool>();
            bSearchable = new List<bool>();
            sSearchValues = new List<string>();
            iSortCol = new List<int>();
            sSortDir = new List<string>();
            bEscapeRegexColumns = new List<bool>();
        }

        public DataTablesParam(int iColumns)
        {
            this.iColumns = iColumns;
            sColumnNames = new List<string>(iColumns);
            bSortable = new List<bool>(iColumns);
            bSearchable = new List<bool>(iColumns);
            sSearchValues = new List<string>(iColumns);
            iSortCol = new List<int>(iColumns);
            sSortDir = new List<string>(iColumns);
            bEscapeRegexColumns = new List<bool>(iColumns);
        }


    }


# Controller Code (TestController.cs)
Create a Test controller and copy below code into this. 

using MVCTutorial.Models;
using System;
using System.Collections.Generic;
using System.Globalization;
using System.IO;
using System.Linq;
using System.Net;
using System.Net.Mail;
using System.Text;
using System.Threading;
using System.Web;
using System.Web.Mvc;

namespace MVCTutorial.Controllers
{

    public class TestController : Controller
    {

        public ActionResult Index()
        {
            MVCTutorialEntities db = new MVCTutorialEntities();

            List<Department> list = db.Departments.ToList();
            ViewBag.DepartmentList = new SelectList(list, "DepartmentId", "DepartmentName");

            List<EmployeeViewModel> listEmp = db.Employees.Where(x => x.IsDeleted == false).Select(x => new EmployeeViewModel { Name = x.Name, DepartmentName = x.Department.DepartmentName, Address = x.Address, EmployeeId = x.EmployeeId }).ToList();

            ViewBag.EmployeeList = listEmp;

            return View();
        }

        public ActionResult SideMenu()
        {
            return PartialView("SideMenu");
        }

        public JsonResult GetEmployeeRecord(DataTablesParam param, string EName)
        {

            MVCTutorialEntities db = new MVCTutorialEntities();
            List<EmployeeViewModel> List = new List<EmployeeViewModel>();

            int pageNo = 1;

            if (param.iDisplayStart >= param.iDisplayLength)
            {

                pageNo = (param.iDisplayStart / param.iDisplayLength) + 1;

            }

            int totalCount = 0;

            if (param.sSearch != null)
            {
                totalCount = db.Employees.Where(x => x.Name.Contains(param.sSearch) || x.Department.DepartmentName.Contains(param.sSearch) || x.Address.Contains(param.sSearch)).Count();

                List = db.Employees

                    .Where(x => x.Name.Contains(param.sSearch) || x.Department.DepartmentName.Contains(param.sSearch) || x.Address.Contains(param.sSearch))

                    .OrderBy(x => x.EmployeeId)
                    .Skip((pageNo - 1) * param.iDisplayLength)
                    .Take(param.iDisplayLength)

                    .Select(x => new EmployeeViewModel
               {
                   Name = x.Name,
                   EmployeeId = x.EmployeeId,
                   DepartmentId = x.DepartmentId,
                   DepartmentName = x.Department.DepartmentName,
                   Address = x.Address,
                   IsDeleted = x.IsDeleted
               }).ToList();
            }
            else if (EName != null)
            {
                totalCount = db.Employees.Where(x => x.Name.Contains(EName)).Count();

                List = db.Employees

                    .Where(x => x.Name.Contains(EName))

                    .OrderBy(x => x.EmployeeId)
                    .Skip((pageNo - 1) * param.iDisplayLength)
                    .Take(param.iDisplayLength)

                    .Select(x => new EmployeeViewModel
                    {
                        Name = x.Name,
                        EmployeeId = x.EmployeeId,
                        DepartmentId = x.DepartmentId,
                        DepartmentName = x.Department.DepartmentName,
                        Address = x.Address,
                        IsDeleted = x.IsDeleted
                    }).ToList();

            }
            else
            {
                totalCount = db.Employees.Count();

                List = db.Employees.OrderBy(x => x.EmployeeId).Skip((pageNo - 1) * param.iDisplayLength).Take(param.iDisplayLength).Select(x => new EmployeeViewModel
                               {
                                   Name = x.Name,
                                   EmployeeId = x.EmployeeId,
                                   DepartmentId = x.DepartmentId,
                                   DepartmentName = x.Department.DepartmentName,
                                   Address = x.Address,
                                   IsDeleted = x.IsDeleted
                               }).ToList();
            }


            return Json(new
            {
                aaData = List,
                sEcho = param.sEcho,
                iTotalDisplayRecords = totalCount,
                iTotalRecords = totalCount

            }
                , JsonRequestBehavior.AllowGet);

        }

        [HttpPost]
        public ActionResult Index(EmployeeViewModel model)
        {
            try
            {
                MVCTutorialEntities db = new MVCTutorialEntities();
                List<Department> list = db.Departments.ToList();
                ViewBag.DepartmentList = new SelectList(list, "DepartmentId", "DepartmentName");

                if (model.EmployeeId > 0)
                {
                    //update
                    Employee emp = db.Employees.SingleOrDefault(x => x.EmployeeId == model.EmployeeId && x.IsDeleted == false);

                    emp.DepartmentId = model.DepartmentId;
                    emp.Name = model.Name;
                    emp.Address = model.Address;
                    db.SaveChanges();


                }
                else
                {
                    //Insert
                    Employee emp = new Employee();
                    emp.Address = model.Address;
                    emp.Name = model.Name;
                    emp.DepartmentId = model.DepartmentId;
                    emp.IsDeleted = false;
                    db.Employees.Add(emp);
                    db.SaveChanges();

                }
                return View(model);

            }
            catch (Exception ex)
            {

                throw ex;
            }

        }

        public ActionResult AddEditEmployee(int EmployeeId)
        {
            MVCTutorialEntities db = new MVCTutorialEntities();
            List<Department> list = db.Departments.ToList();
            ViewBag.DepartmentList = new SelectList(list, "DepartmentId", "DepartmentName");

            EmployeeViewModel model = new EmployeeViewModel();

            if (EmployeeId > 0)
            {

                Employee emp = db.Employees.SingleOrDefault(x => x.EmployeeId == EmployeeId && x.IsDeleted == false);
                model.EmployeeId = emp.EmployeeId;
                model.DepartmentId = emp.DepartmentId;
                model.Name = emp.Name;
                model.Address = emp.Address;

            }
            return PartialView("Partial2", model);
        }


    }
}


All Code Factory


Part 49 - Pagination using Skip and Take method | JQuery DataTable Server side


In this video you will be able to know how to implement pagination  in server side processing in JQuery Datatables. 

If you are new to DataTables then please download latest version of Jquery DataTable. Click here to download the latest version of Jquery Datatable and watch my previous tutorial to get step by step DataTable plugin installation guide. you can visit here: Integrate JQuery DataTable plugin into Asp.net MVC 

The expected output will be as what displayed in following image. 


# View Page (Index.cshtml)
Right click on your controller' s Index method and add a view. After adding view, replace content with below code. 

@model MVCTutorial.Models.EmployeeViewModel
@{
    ViewBag.Title = "Index";
    // Layout = null;
}

<div class="panel panel-body" style="min-height:256px">

    <div class="col-md-3">

        @{ Html.RenderAction("SideMenu", "Test");}

    </div>

    <div class="col-md-9">

        <div class="well">
            <a href="#" class="btn btn-primary" onclick="AddEditEmployee(0)">New</a>
        </div>
        <table class="display" id="MyDataTable">
            <thead>
                <tr>
                    <th>
                        EmaployeeName
                    </th>
                    <th>
                        Department
                    </th>
                    <th>
                        Address
                    </th>
                    <th>
                        EmployeeId
                    </th>
                </tr>
            </thead>

            <tbody></tbody>

        </table>
        <div class="modal fade" id="myModal1">
            <div class="modal-dialog">
                <div class="modal-content">
                    <div class="modal-header">
                        <a href="#" class="close" data-dismiss="modal">&times;</a>
                        <h3 class="modal-title">AddEdit Employee</h3>
                    </div>
                    <div class="modal-body" id="myModalBodyDiv1">


                    </div>


                </div>

            </div>

        </div>

        <input type="hidden" id="hiddenEmployeeId" />
    </div>
</div>

<script>

        $(document).ready(function () {

            // $("#MyDataTable").DataTable();

            BindDataTable();
        })
      
        var BindDataTable = function (response) {

            $("#MyDataTable").DataTable({
                "bServerSide": true,
                "sAjaxSource": "/Test/GetEmployeeRecord",
                "fnServerData": function (sSource,aoData,fnCallback) {
                    
                    $.ajax({

                        type: "Get",
                        data:aoData,
                        url: sSource,
                        success:fnCallback
                    })

                },
                "aoColumns": [

                    { "mData": "Name" },
                    { "mData": "DepartmentName" },
                    { "mData": "Address" },
                    {
                        "mData": "EmployeeId",
                        "render": function (EmployeeId, type, full, meta) {
                            debugger
                            return '<a href="#" onclick="AddEditEmployee(' + EmployeeId + ')"><i class="glyphicon glyphicon-pencil"></i></a>'
                        }
                    },


                ]

            });
        }

        var AddEditEmployee = function (employeeId) {

            var url = "/Test/AddEditEmployee?EmployeeId=" + employeeId;

            $("#myModalBodyDiv1").load(url, function () {
                $("#myModal1").modal("show");

            })

        }
</script>


  # DataTablesParam Class.
Create a class named DataTableParams and copy below code into this. This class will be used for receiving dataTables default parameters. You can remove extra properties which are not useful to you. Also, please don't forget to copy EmployeeViewModel  from Part 20 of this tutorial series. 


public class DataTablesParam
    {
        public int iDisplayStart { get; set; }
        public int iDisplayLength { get; set; }
        public int iColumns { get; set; }
        public string sSearch { get; set; }
        public bool bEscapeRegex { get; set; }
        public int iSortingCols { get; set; }
        public int sEcho { get; set; }
        public List<string> sColumnNames { get; set; }
        public List<bool> bSortable { get; set; }
        public List<bool> bSearchable { get; set; }
        public List<string> sSearchValues { get; set; }
        public List<int> iSortCol { get; set; }
        public List<string> sSortDir { get; set; }
        public List<bool> bEscapeRegexColumns { get; set; }

        public DataTablesParam()
        {
            sColumnNames = new List<string>();
            bSortable = new List<bool>();
            bSearchable = new List<bool>();
            sSearchValues = new List<string>();
            iSortCol = new List<int>();
            sSortDir = new List<string>();
            bEscapeRegexColumns = new List<bool>();
        }

        public DataTablesParam(int iColumns)
        {
            this.iColumns = iColumns;
            sColumnNames = new List<string>(iColumns);
            bSortable = new List<bool>(iColumns);
            bSearchable = new List<bool>(iColumns);
            sSearchValues = new List<string>(iColumns);
            iSortCol = new List<int>(iColumns);
            sSortDir = new List<string>(iColumns);
            bEscapeRegexColumns = new List<bool>(iColumns);
        }


    }


# Controller Code (TestController.cs)

Create a Test controller and copy below code into this.

using MVCTutorial.Models;
using System;
using System.Collections.Generic;
using System.Globalization;
using System.IO;
using System.Linq;
using System.Net;
using System.Net.Mail;
using System.Text;
using System.Threading;
using System.Web;
using System.Web.Mvc;

namespace MVCTutorial.Controllers
{

    public class TestController : Controller
    {

        public ActionResult Index()
        {
            MVCTutorialEntities db = new MVCTutorialEntities();

            List<Department> list = db.Departments.ToList();
            ViewBag.DepartmentList = new SelectList(list, "DepartmentId", "DepartmentName");

            List<EmployeeViewModel> listEmp = db.Employees.Where(x => x.IsDeleted == false).Select(x => new EmployeeViewModel { Name = x.Name, DepartmentName = x.Department.DepartmentName, Address = x.Address, EmployeeId = x.EmployeeId }).ToList();

            ViewBag.EmployeeList = listEmp;

            return View();
        }

        public ActionResult SideMenu()
        {
            return PartialView("SideMenu");
        }

        public JsonResult GetEmployeeRecord(DataTablesParam param)
        {

            MVCTutorialEntities db = new MVCTutorialEntities();
            List<EmployeeViewModel> List = new List<EmployeeViewModel>();

            int pageNo = 1;

            if (param.iDisplayStart >= param.iDisplayLength) {

                pageNo = (param.iDisplayStart / param.iDisplayLength) + 1;
                               
            }

            int totalCount = 0;

            if (param.sSearch != null)
            {
                totalCount = db.Employees.Where(x => x.Name.Contains(param.sSearch) || x.Department.DepartmentName.Contains(param.sSearch) || x.Address.Contains(param.sSearch)).Count();

                List = db.Employees
                    
                    .Where(x => x.Name.Contains(param.sSearch) || x.Department.DepartmentName.Contains(param.sSearch) || x.Address.Contains(param.sSearch))
                    
                    .OrderBy(x => x.EmployeeId)
                    .Skip((pageNo - 1) * param.iDisplayLength)
                    .Take(param.iDisplayLength)                 
                    
                    .Select(x => new EmployeeViewModel
               {
                   Name = x.Name,
                   EmployeeId = x.EmployeeId,
                   DepartmentId = x.DepartmentId,
                   DepartmentName = x.Department.DepartmentName,
                   Address = x.Address,
                   IsDeleted = x.IsDeleted
               }).ToList();
            }
            else
            {
                totalCount = db.Employees.Count();

                List = db.Employees.OrderBy(x => x.EmployeeId).Skip((pageNo - 1) * param.iDisplayLength).Take(param.iDisplayLength).Select(x => new EmployeeViewModel
                               {
                                   Name = x.Name,
                                   EmployeeId = x.EmployeeId,
                                   DepartmentId = x.DepartmentId,
                                   DepartmentName = x.Department.DepartmentName,
                                   Address = x.Address,
                                   IsDeleted = x.IsDeleted
                               }).ToList();
            }
            

            return Json(new
            {
                aaData = List,
                sEcho = param.sEcho,
                iTotalDisplayRecords = totalCount,
                iTotalRecords = totalCount

            }
                , JsonRequestBehavior.AllowGet);

        }

        [HttpPost]
        public ActionResult Index(EmployeeViewModel model)
        {
            try
            {
                MVCTutorialEntities db = new MVCTutorialEntities();
                List<Department> list = db.Departments.ToList();
                ViewBag.DepartmentList = new SelectList(list, "DepartmentId", "DepartmentName");

                if (model.EmployeeId > 0)
                {
                    //update
                    Employee emp = db.Employees.SingleOrDefault(x => x.EmployeeId == model.EmployeeId && x.IsDeleted == false);

                    emp.DepartmentId = model.DepartmentId;
                    emp.Name = model.Name;
                    emp.Address = model.Address;
                    db.SaveChanges();


                }
                else
                {
                    //Insert
                    Employee emp = new Employee();
                    emp.Address = model.Address;
                    emp.Name = model.Name;
                    emp.DepartmentId = model.DepartmentId;
                    emp.IsDeleted = false;
                    db.Employees.Add(emp);
                    db.SaveChanges();

                }
                return View(model);

            }
            catch (Exception ex)
            {

                throw ex;
            }

        }

        public ActionResult AddEditEmployee(int EmployeeId)
        {
            MVCTutorialEntities db = new MVCTutorialEntities();
            List<Department> list = db.Departments.ToList();
            ViewBag.DepartmentList = new SelectList(list, "DepartmentId", "DepartmentName");

            EmployeeViewModel model = new EmployeeViewModel();

            if (EmployeeId > 0)
            {

                Employee emp = db.Employees.SingleOrDefault(x => x.EmployeeId == EmployeeId && x.IsDeleted == false);
                model.EmployeeId = emp.EmployeeId;
                model.DepartmentId = emp.DepartmentId;
                model.Name = emp.Name;
                model.Address = emp.Address;

            }
            return PartialView("Partial2", model);
        }


    }
}


All Code Factory