In this tutorial, You will learn about how to add Domain Layer under repository pattern implementation in Asp.net MVC . In previous tutorial we learned about how to add Business Layer . Lets again look at below layers and get idea about what is the use of them.
1. Web Layer is your MVC web Project
2. Business Layer consist the CRUD operation, gets data from Data Access Layer, Manipulate them and finally returns data to the Controller ( Web Layer)
3. Domain Layer consist the Domain Models or Classes that hold the data coming from Data Access Layer. Both Web and Business Layer can use domain models to exchange data.
4. Data Access Layer consist the generic repository methods (generic CRUD operation), Unit of Work( Database Context) and NON Generic repository( User defined repository).

#How to create Domain Layer?
Please follow below Steps
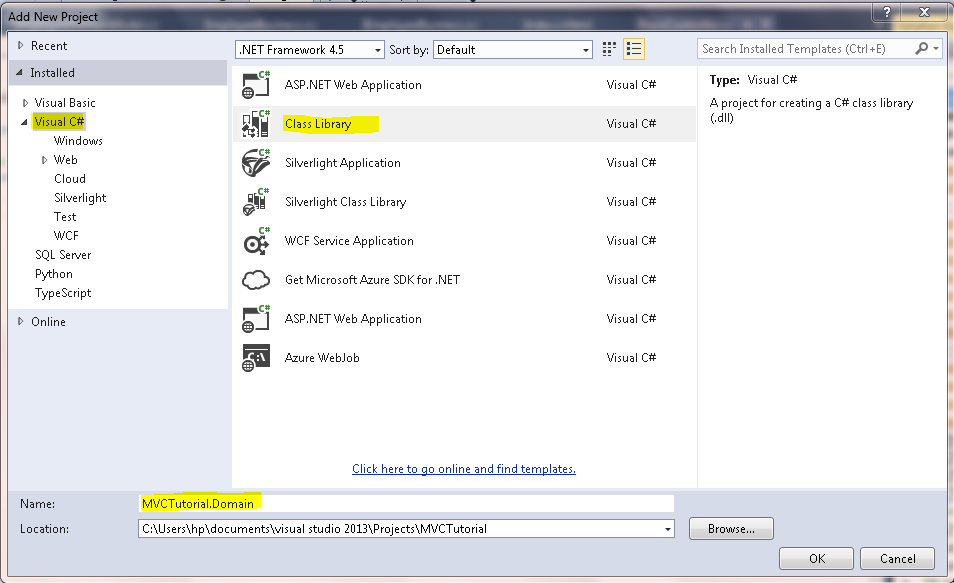
Step 1 : Right Click on your solution and click on Add, then click on New Project. If you notice that, this step is similar to our previous tutorial for adding Business Layer . Isn't it.

Step 2 : After opening the popup, select class Library option and give a meaningful name

Step 1 : Right Click on your solution and click on Add, then click on New Project. If you notice that, this step is similar to our previous tutorial for adding Business Layer . Isn't it.

Step 2 : After opening the popup, select class Library option and give a meaningful name
Step 3 : Add a class( EmployeeDomainModel.cs) into your Domain Layer

Step 4 : In previous tutorial(How to add Business Layer) if you do remember, we added interface and concrete class into our Business Layer. Do you? If not then create Business Layer and do below things..
"Add an Interface Folder into your business layer then create IEmployeBusiness interface and finally add a method into this example: GetEmployeeName(). After adding interface, add a concrete class EmpolyeeBusiness which will implement the IEmployeeBusiness Methods. Please see below screenshot. Copy below code in your interface and class."

Now in this tutorial, we are gonna add one more method(GetAllEmployee()) in our Business layer's interface and class.

Copy below content in your EmployeeDomainLayer Class
using System;
using System.Collections.Generic;
using System.Linq;
using System.Text;
using System.Threading.Tasks;

namespace MVCTutorial.Domain
{
    public class EmployeeDomainModel
    {

        public int EmployeeId { get; set; }
        public string Name { get; set; }
        public string Address { get; set; }
        public string DepartmentName { get; set; }
    }
}
Step 4 : In previous tutorial(How to add Business Layer) if you do remember, we added interface and concrete class into our Business Layer. Do you? If not then create Business Layer and do below things..
"Add an Interface Folder into your business layer then create IEmployeBusiness interface and finally add a method into this example: GetEmployeeName(). After adding interface, add a concrete class EmpolyeeBusiness which will implement the IEmployeeBusiness Methods. Please see below screenshot. Copy below code in your interface and class."

Now in this tutorial, we are gonna add one more method(GetAllEmployee()) in our Business layer's interface and class.
A. IEmployeeBusiness( Interface)
using MVCTutorial.Domain;
using System;
using System.Collections.Generic;
using System.Linq;
using System.Text;
using System.Threading.Tasks;

namespace MVCTutorial.Business.Interface
{
    public interface IEmployeeBusiness
    {
        string GetEmployeeName(int EmpId);
        List<EmployeeDomainModel> GetAllEmployee();
    }
}
B. Employeebusiness ( Concrete class)
using MVCTutorial.Business.Interface;
using MVCTutorial.Domain;
using MVCTutorial.Repository;
using System;
using System.Collections.Generic;
using System.Linq;
using System.Text;
using System.Threading.Tasks;

namespace MVCTutorial.Business
{
    public class EmployeeBusiness : IEmployeeBusiness
    {

        public string GetEmployeeName(int EmpId)
        {
            return "Ashish" + EmpId;
        }

        public List<EmployeeDomainModel> GetAllEmployee()
        {
            List<EmployeeDomainModel> list = new List<EmployeeDomainModel>();

            list.Add(new EmployeeDomainModel { Name = "Ashish", EmployeeId = 1 });
            list.Add(new EmployeeDomainModel { Name = "Rob", EmployeeId = 2 });
            list.Add(new EmployeeDomainModel { Name = "Sara", EmployeeId = 3 });
            list.Add(new EmployeeDomainModel { Name = "Jack", EmployeeId = 4 });
            list.Add(new EmployeeDomainModel { Name = "Peter", EmployeeId = 5 });

            return list;

        }
    }
}
Step 5 : Go to your Web Layer and add the reference of Domain Layer (check the MVCTutorial.Domain checkbox ). I hope you already added the reference of Business Layer. Forget about MVCTutorial.Repository, we will cover that in next tutorial.

Step 6 : Create an instance of EmployeeBusiness Class in your controller, then access GetEmployeeName() method and you are done. Here you will notice that, we are creating an instance of EmployeeBusiness, then calling GetAllEmployee() method and finally storing data into EmployeeDomainModel list (see listDomain). I have stored this list of data into ViewBag.EmployeeList. Further, I can use it anywhere in my View
#Controller Code(RepoController.cs) : Copy the controller code below.
using MVCTutorial.Business;
using MVCTutorial.Business.Interface;
using MVCTutorial.Domain;
using MVCTutorial.Models;
using System;
using System.Collections.Generic;
using System.Linq;
using System.Web;
using System.Web.Mvc;

namespace MVCTutorial.Controllers
{
    public class RepoController : Controller
    {
        public ActionResult Index()
        {
            IEmployeeBusiness _empBusiness = new EmployeeBusiness();

            ViewBag.EmpName = _empBusiness.GetEmployeeName(254);

            List<EmployeeDomainModel> listDomain = _empBusiness.GetAllEmployee();

            //List<EmployeeViewModel> listemployeeVM = new List<EmployeeViewModel>();

            //AutoMapper.Mapper.Map(listDomain, listemployeeVM);

            ViewBag.EmployeeList = listDomain;


            return View();
        }
    }
}
Note: In above code, I have commented the line where I have used Automapper. If you want to learn how the Automapper helps in object to object mapping then you can visit here (How to use Automapper in MVC)
What NEXT=>( Dependency Injection In Asp.net MVC )
Please Like, Share and subscribe our Channel. Have a great day.
All Code Factory
- Part 11- Insert data into database
- Part 12- Server side and clientside validation
- Part 13- Insert data into multiple tables
- Part 14- Insert data into database using JQuery
- Part 15- How to create Bootstrap Popup
- Part 16- Delete operation in Asp.net MVC
- Part 17- What is Partial View in Asp.net MVC
- Part 18- How to call Partial View using JQuery
- Part 19- Difference between Html.Partial() and Html.RenderPartial()
- Part 20- AddEdit Record using Partial View
- Part 21- Layout View in Asp.net MVC
- Part 22- Style.Render and Script.Render
- Part 23 - RenderBody, RenderSection and RenderPage.
- Part 24- Divide Page into several component using Bootstrap
- Part 25- Refresh Entity framework after any modification in database table
- Part 26- Set foreign key relationnship in database tables
- Part 27- Create Rgistration Page
- Part 28- Create Login Page
- Part 29- Client Side Validation using JQuery
- Part 30- How to return multiple Model to a View (Interview)
- Part 31- How to create Dynamic Menu using Partial View
- Part 32- Preview Image Before Uploading
- Part 33- Upload and Display Image using JQuery
- Part 34-Upload Image to SQL Server and Display
- Part 35- Download Image from URL and Upload to SQL Server
- Part 36- Cascading DropdownList
- Part 37- Implement Search Functionality
- Part 38- Attribute Routing in MVC
- Part 39- How to display multiple checkbox checked data
- Part 40- How to send multiple checkbox checked value to Server
- Part 41- How to create responsive sortable Image Gallery
- Part 42 - How to implement JQuery Autocomplete Textbox
- Part 43 - How to send Emails in Asp.net MVC
- Part 44 - Integrate JQuery DataTables plugin
- Part 45 - Display record from database using JQuery Datatable
- Part 46- Add Edit Record using JQuery DataTable
- Part 47 - JQuery DataTables Server -side Processing
- Part 48 - JQuery server side processing -Search functionality
- Part 49 - Pagination using Skip and Take method
- Part 50 - Refresh DataTable After Performing Any Action
- Part 51 - Send OTP ( One Time Password ) to any mobile device
- Part 52 - How to use AutoMapper in Asp.net MVC
- Part 53 - How to use AutoMapper ForMember Method
- Part 54 - Repository Pattern - 1 - Adding Business Layer
- Part 55 - Repository Pattern - 2 - Adding Domain Layer
- Part 56 - Repository Pattern - 3 - Dependency Injection
- Part 57- Repository Pattern- 4 - Adding Data Access Layer
- Part 58 - Repository Pattern - 5 - Setting Up Generic Repository
- Part 59 - Display Record using repository pattern
- Part 60 - Add Edit Record using Repository Pattern
1 comment:
Best Information Website, Thank You. A New internet Tips Website Lunched
The Internet Tips
Best Information Website, Thank You. A New internet Tips Website Lunched
The Internet Tips
Best Information Website, Thank You. A New internet Tips Website Lunched
The Internet Tips
Best Information Website, Thank You. A New internet Tips Website Lunched
The Internet Tips
Post a Comment